 Save
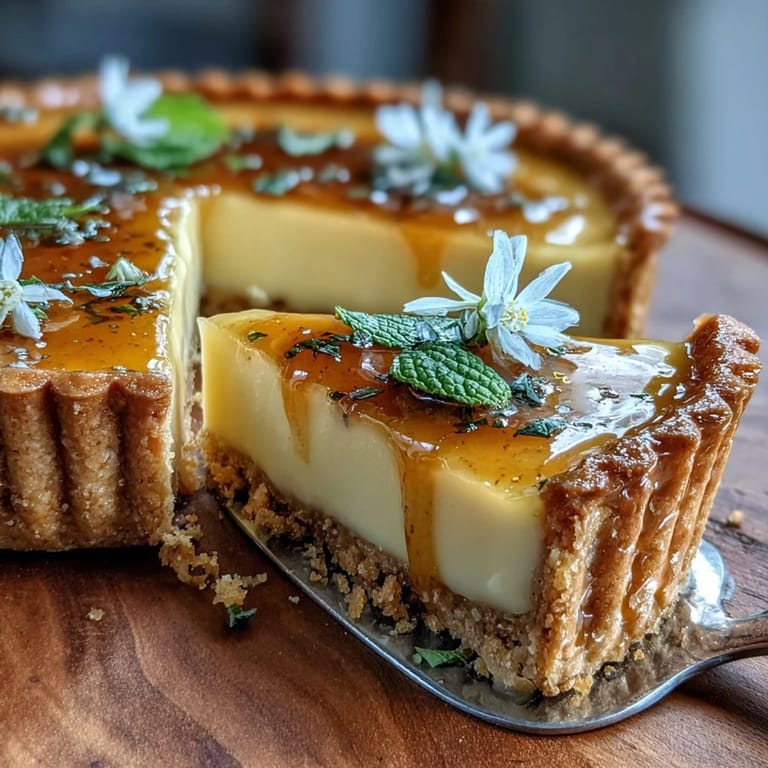
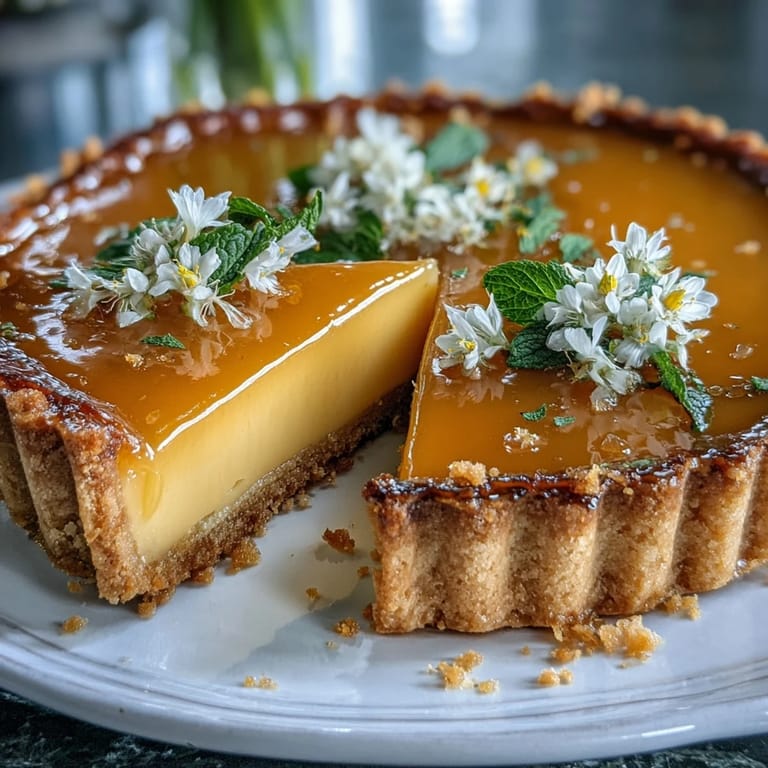
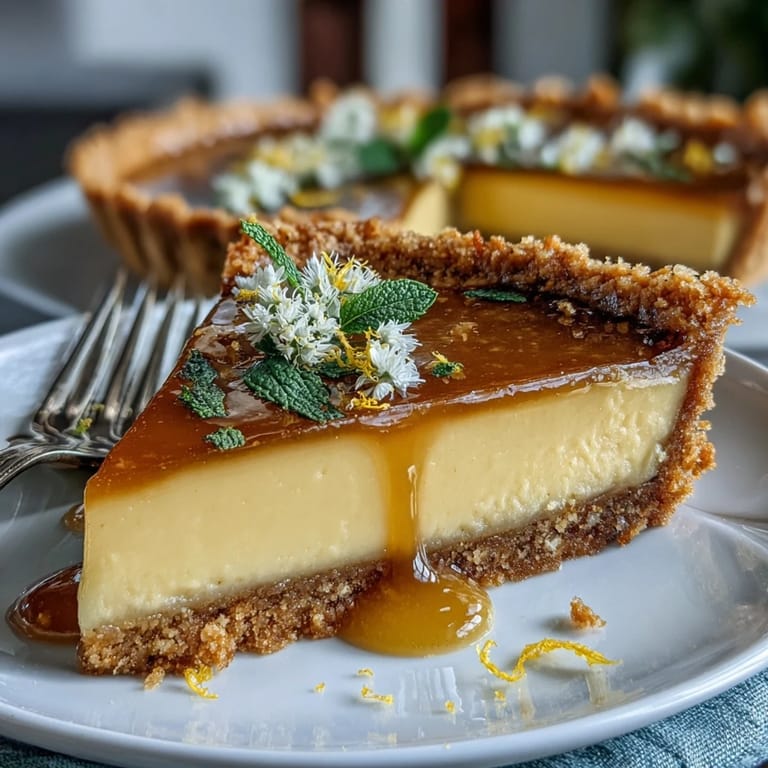
Save Cracking open lemons on a breezy April afternoon makes me think of fresh starts—the smell alone is bright enough to lift a cloudy day. I can still hear the click of my tart pan as I fit the dough in, a task that once felt daunting but now feels like a quiet ritual. There’s something special about transforming such simple ingredients into something stunning, especially when I scatter the edible flowers with flour-dusted fingers. The first time I made this Lemon Curd Spring Tart, the curd was a little runnier than I’d hoped, but by the time we finished our slices, nobody seemed to mind. Each time I make it, I’m reminded that even small imperfections can look gorgeous with the right flourish on top.
I pulled this tart together for a friend’s birthday picnic in the park, carefully balancing it on my lap for the train ride. As we sliced it on a checked blanket, the petals caught the light and someone actually paused mid-bite to ask how on earth I’d made curd that smooth. I’ll never forget the shared laughter when a gust of wind tried to sweep away both napkins and flowers, but everyone scrambled to save the tart first. Now whenever I bake it, I think of that moment—the tart as the star of an impromptu al fresco celebration.
Ingredients
- All-purpose flour: Gives the tart shell its signature crispness; I’ve found that sifting it first helps ensure a delicate crumb.
- Unsalted butter (cold, cubed): Cold butter is key for those lovely flaky layers, so I always cube it straight from the fridge and work quickly.
- Powdered sugar: Adds subtle sweetness and a tender texture to the shell—don’t skip the sifting, or you’ll have lumps.
- Egg yolk: One yolk brings richness and helps the dough come together; save the white for brushing or another recipe.
- Cold water: Just a splash for cohesion; add it gradually so the dough doesn’t get sticky.
- Salt: Balances out the sweetness, making the flavors pop.
- Eggs (for curd): Whole eggs make the curd silky and luscious; use room temperature eggs for the smoothest blend.
- Granulated sugar: Adds the necessary sweetness to counter the lemons, melding into a glossy custard.
- Lemon zest & juice: Both are essential for super-charged citrus flavor—I zest before juicing to avoid a mess.
- Unsalted butter (for curd): Finishes the curd luxuriously; add it a little at a time for the silkiest result.
- Edible flowers and fresh mint leaves: The finishing touch for a dramatic, cheerful spring presentation; always check they’re food-safe before decorating.
Tired of Takeout? 🥡
Get 10 meals you can make faster than delivery arrives. Seriously.
One email. No spam. Unsubscribe anytime.
Instructions
- Crumble and form the dough:
- Pulse flour, powdered sugar, and salt, then add cold butter—listen for the gentle thud as the cubes break down, watching crumbs form like wet sand. Work in the egg yolk and water just until the dough comes together; don’t overmix.
- Chill and roll out:
- Shape the dough into a disk, wrap tightly, and let it chill—it firms up, making rolling less sticky and more forgiving. Roll it out to fit your tart pan, smoothing cracks with your fingertips as you tuck it in.
- Blind bake:
- Line with parchment and scatter in pie weights, then bake until the shell sets and edges take on a pale golden hue. Remove the weights and go a bit further until it smells irresistibly toasty—let it cool completely before filling.
- Whisk up the lemon curd:
- Whisk eggs, sugar, zest, and juice in a pan, then set over gentle heat and stir constantly. Watch as it thickens and brightens, the scent blooming as it nears readiness; off the heat, whisk in cold butter for the glossiest finish.
- Strain and cool:
- Push the curd through a sieve to catch any cooked bits, and let it cool to room temperature—it will thicken more as it cools. Sneak a taste at this point; it should taste like pure sunshine.
- Fill, chill, and set:
- Pour the cooled curd into your baked shell, smoothing the surface with the back of a spoon. Let it chill for at least an hour so the tart slices up cleanly and the curd holds its shape.
- Decorate and serve:
- Right before you bring it to the table, artfully scatter edible flowers and mint on top—no need for perfection, it’s most beautiful when a little wild. Slice and admire your work before anyone else gets their fork in.
 Save
Save There was a late spring afternoon when I set this tart down at the center of the table and the whole room seemed to pause and breathe in. My niece, notorious for disliking anything 'too lemony,' surprised us all by asking for seconds, and suddenly it was more than dessert—it was proof that a little color and care can win anyone over.
Taming Lemon Curd in Your Kitchen
I used to be nervous about making lemon curd, worrying it would split or turn into sweet lemony scrambled eggs. The trick I learned is low heat, constant whisking, and pulling it off the stove as soon as it thickens enough to coat the back of a spoon. Letting it cool naturally makes it even smoother—a patience payoff that makes assembling the tart pure joy.
Making the Perfect Tart Shell (with Fewer Tears)
The first few shells I made shrank and cracked—rolling the dough evenly and not skipping the chilling time fixed almost every issue. Pricking the base and using parchment with weights keeps bubbles at bay and gives the tart a crisp bottom worthy of any bakery. If you feel fiddly bits tearing, just patch with leftover dough—no one’s looking underneath the curd anyway.
Decorating for Drama and Joy
This is where you get to play—no two tarts will ever look quite the same, and that's the fun. Sometimes I go big with a riot of pansies and violets, other times I keep it sparse with just a few mint sprigs and a single flower in the center. Whatever you choose, edible flowers bring instant wow and feel like a celebration on a plate.
- If your flowers wilt quickly, dip them briefly in cold water and pat dry before arranging.
- Scatter flowers at the last minute so they're at their freshest.
- Let the tart come to room temp for the fullest flavor before serving.
 Save
Save This Lemon Curd Spring Tart is pure brightness in every slice—perfect for happy gatherings or just bringing a breath of spring to your kitchen counter. Share generously and watch as everyone enjoys their moment of sunshine.
Recipe FAQs
- → How do I prevent the curd from curdling?
Cook the curd over medium-low heat and whisk constantly. Remove from heat as soon as it thickens and coats the back of a spoon; residual heat will finish it. Straining also smooths any bits.
- → Tips for a crisp tart shell?
Keep butter cold and avoid overworking the dough. Chill the shell before baking, use parchment and pie weights for blind baking, and bake until the edges are golden for a crisp result.
- → Can I make the curd ahead of time?
Yes. Cook and cool the curd, then refrigerate in an airtight container for up to 3 days. Bring to room temperature before pouring into the shell for easier setting.
- → Best edible flowers to use?
Violets, pansies and nasturtiums are aromatic and visually striking. Ensure they are labeled edible and pesticide-free. Use sparingly to let the curd shine.
- → How to adapt the shell for gluten-free diets?
Substitute a gluten-free flour blend with xanthan gum if needed, chill the dough well, and handle gently. Blind-bake as usual and check for a slight browning to confirm doneness.
- → How should I store leftovers?
Cover and refrigerate for up to 3 days. Bring to cool room temperature before serving; avoid prolonged room exposure to maintain curd texture and freshness of flowers.