 Save
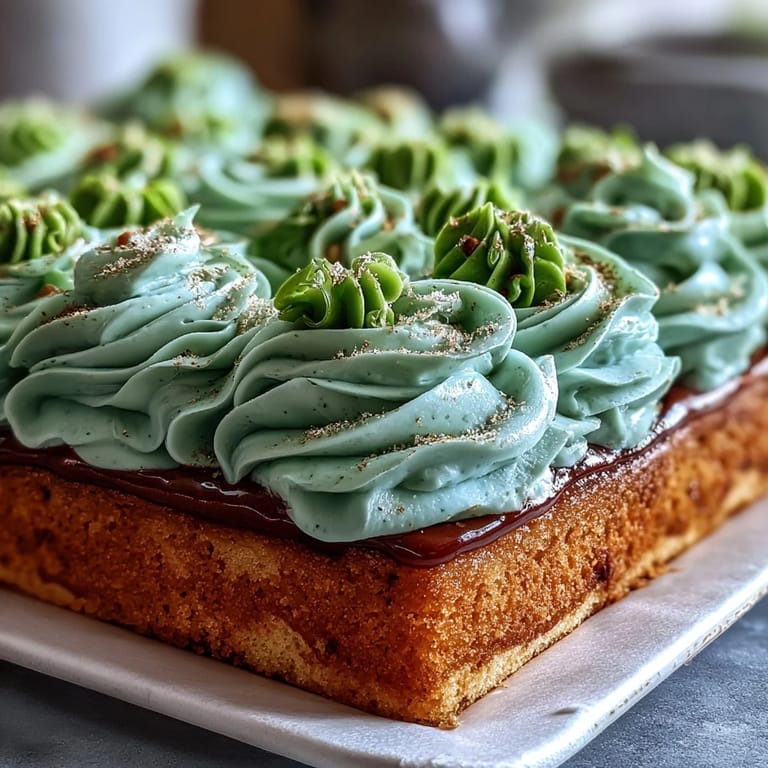
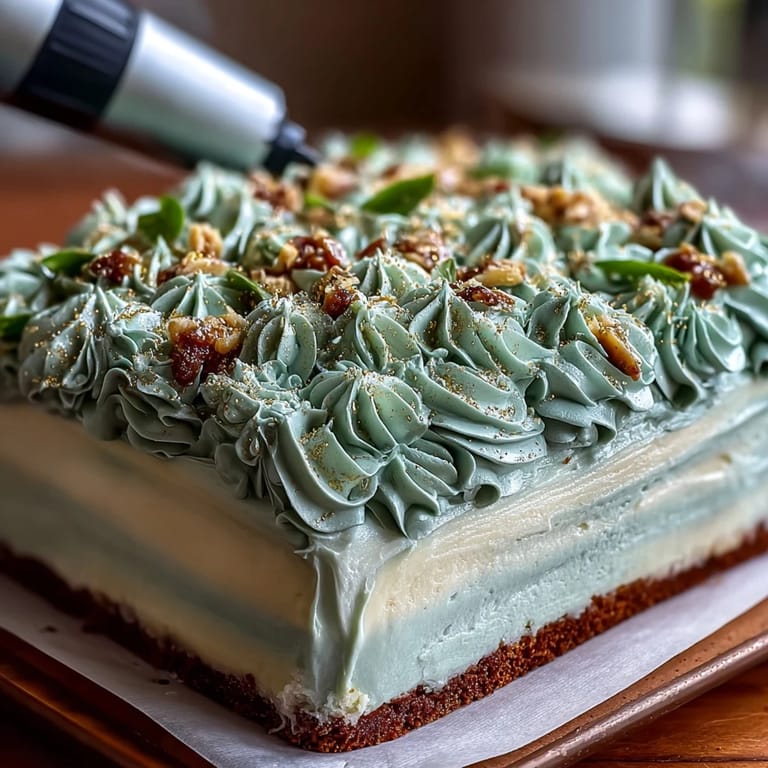
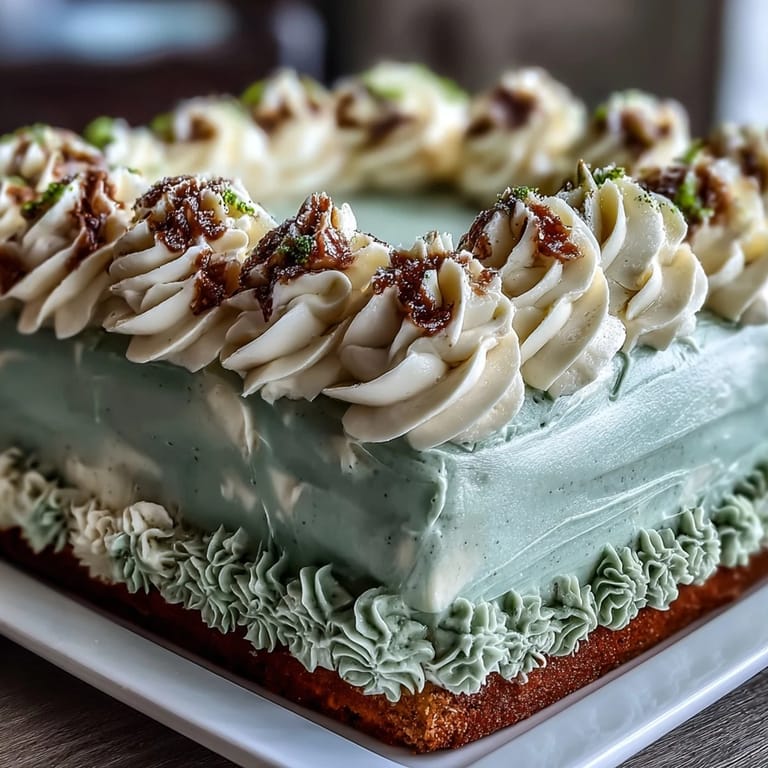
Save When I first coated a cake in sage green buttercream, the hue nearly stole the show from the dessert itself the soft color instantly turned the kitchen into an art studio. This particular sheet cake became my go-to for milestone celebrations, especially graduations where something cheerful yet classy is always called for. The moment you get a whiff of vanilla and gently sweet butter wafting from the oven, you can sense celebration in the air. I’d once intended the gold details as a casual touch, but it ended up being the part guests snapped photos of before even cutting in. Even when the counters fill up with piping bags and a brush for luster dust, it feels more like grown-up playtime than work.
I can't forget the year my cousin graduated and we all crammed into the living room, the cake balanced on my knees as I piped ‘Congrats’ alongside a smiley-faced cap. My niece swirled on a gold accent and grinned when it sparkled under the lights, declaring it looked like 'the fanciest cake ever.'
Ingredients
- All-purpose flour: This gives the cake its structure make sure to spoon and level for accurate measuring, which I learned prevents dry layers.
- Baking powder: Essential for a tender, risen crumb—don’t skip sifting if you want an even rise.
- Salt: Just a pinch boosts all the other flavors without making things taste salty.
- Unsalted butter: Room temperature is key for both the cake and buttercream, ensuring smooth creaming and a melt-in-the-mouth texture.
- Granulated sugar: Creaming this into the butter gives the cake that perfect moist crumb, and don’t rush this step.
- Eggs: Bring them to room temperature for even blending you’ll notice the batter holds a lovely structure.
- Pure vanilla extract: Real vanilla deepens the cake’s nostalgic scent, while the buttercream benefits from its warmth.
- Whole milk: This adds richness and a fine, even crumb—let it lose its chill before adding.
- Powdered sugar: Sift it before adding to the butter for an ultra-silky frosting with no lumps.
- Heavy cream or milk (for buttercream): Start with less and add more slowly so you reach that dreamy spreadable consistency.
- Sage green gel food coloring: A few drops go a long way—build the shade slowly so you don’t overshoot.
- Gold edible luster dust: Instantly elevates the cake details, and painting it on is oddly satisfying.
- Clear vanilla extract or vodka: Use just a touch to mix with gold dust and paint on dazzling accents.
Tired of Takeout? 🥡
Get 10 meals you can make faster than delivery arrives. Seriously.
One email. No spam. Unsubscribe anytime.
Instructions
- Prep Your Pan Right:
- Line a large 12x18 inch pan with parchment and generously grease the sides—your future self will thank you when you lift the finished cake out cleanly.
- Whisk the Dry Ingredients:
- In a medium bowl, briskly whisk flour, baking powder, and salt—the sound is oddly soothing and ensures a light crumb.
- Cream Butter and Sugar:
- Use the paddle on your mixer to beat the butter and sugar until pale and pillowy, about 3 or 4 minutes, scraping down the bowl so nothing hides in the corners.
- Add the Eggs and Vanilla:
- Beat in eggs one by one, then vanilla—the batter should look glossy and smooth at this point.
- Combine Wet and Dry:
- Add flour mixture in thirds, alternating with milk and ending on flour swirling gently until just combined without overmixing.
- Bake and Cool:
- Spread the batter evenly, bake for about half an hour until golden, and cool completely in the pan—the waiting is the hardest part.
- Make Sage Buttercream:
- Beat softened butter until it loses all streaks of yellow, then add powdered sugar in gradual bursts, finishing with vanilla, salt, and enough cream to make it spread like a dream.
- Tint and Reserve:
- Stir in sage green coloring a drop at a time to avoid going too bright, reserving half a cup for gold accenting.
- Frost and Decorate:
- Swirl the sage buttercream across the cooled cake, using an offset spatula to even out the color—a little swoop gives elegant texture.
- Gold Accents:
- Mix luster dust with a few drops of clear vanilla or vodka until it’s paint-like, then use a clean brush to add shimmering gold where you please, or marble it into small buttercream details.
- Final Celebratory Touches:
- Pipe on graduation symbols, gold sprinkles, or a congratulatory message—the more festive, the better.
 Save
Save  Save
Save Watching a group of newly-minted grads light up over slices of this cake, gold flecks glinting in the photos, was the moment I realized the power of a thoughtfully decorated homemade dessert to turn small gatherings into cherished occasions.
Making the Celebration Stand Out
One year, I snuck in a few drops of lemon extract for a fresh twist, and guests kept asking why the cake tasted ‘extra bright’. Don’t hesitate to experiment with different flavors in the batter or swap in themed sprinkles matching your grad’s school colors. Even a simple piped border can give your cake bakery charm with very little added effort.
Handling Edible Gold Like a Pro
Brushing gold luster onto buttercream was intimidating at first, but the trick is to keep your strokes light and let the paint dry before touching up. I found that a soft, food-safe paintbrush works worlds better than anything too stiff or small. If you’re mixing luster directly into buttercream, swirl it only partly through to preserve shimmery ribbons for a marbled finish.
Stress-Free Sheet Cake Success
I always set out all my tools—offset spatula, piping bags, and the tiniest paintbrush—in advance so there’s no frenzy once the cake comes out. Sifting the powdered sugar prevents stubborn lumps that can pop up in your otherwise velvety frosting. If in doubt, place the decorated cake in the fridge for twenty minutes to keep the colors vivid while you tidy up.
- Pull your butter out hours ahead for easy mixing.
- Use parchment overhang to lift the cooled cake right from the pan.
- Have a pack of toothpicks handy to check for doneness—every oven varies.
 Save
Save  Save
Save In the end, this sheet cake delivers far more than photos—it brings laughter, little victories, and edible confetti to the table. Enjoy the decorating process and let the occasion shine through every bite.
Recipe FAQs
- → How do I get a smooth, spreadable buttercream?
Beat room-temperature butter until creamy, then add sifted powdered sugar gradually. Add heavy cream a tablespoon at a time to reach a spreadable consistency. Beat until silky and free of lumps for easy smoothing across a sheet surface.
- → How much food coloring should I use for sage green?
Start with a single drop of green gel and a tiny drop of brown or gray to soften the hue, then mix and adjust in small increments until you reach a muted sage tone. Gel colorings give stronger tinting without thinning the buttercream.
- → What’s the best way to apply the gold luster dust?
Mix luster dust with a few drops of clear vanilla or vodka to make edible paint and brush onto piped accents, or fold dust into reserved buttercream for a marbled sheen. Use a small food-safe brush for precise details.
- → How can I get neat, even squares when slicing?
Chill the iced sheet for 15–30 minutes to firm the buttercream, then use a long, sharp knife warmed in hot water and wiped dry between passes to make clean cuts for uniform squares.
- → Can I make flavor variations to the vanilla base?
Yes—swap the vanilla extract for almond, lemon, or chocolate additions. Reduce or adjust other ingredients as needed for balance; for chocolate, replace a portion of flour with cocoa powder and taste for sweetness.
- → How should leftovers be stored?
Cover remaining pieces loosely with plastic wrap or store in an airtight container in the refrigerator for up to 4 days. Bring to room temperature before serving to restore buttercream softness.