 Save
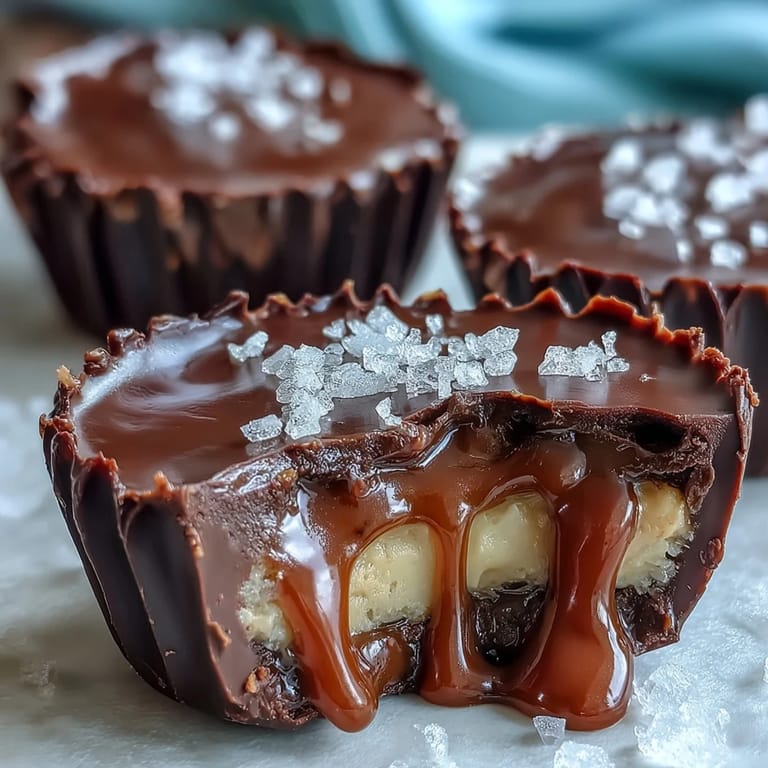
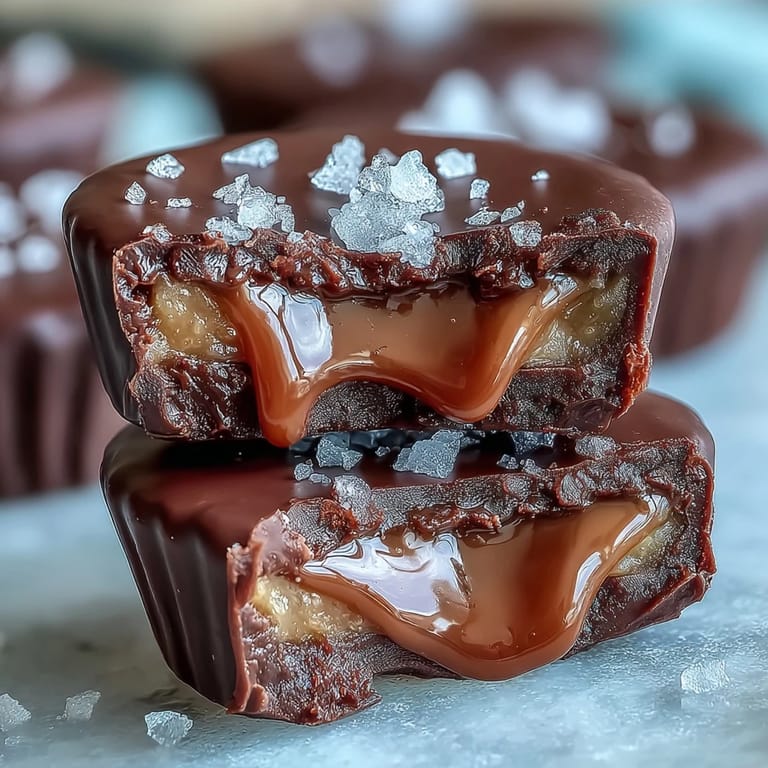
Save My friend Sarah handed me one of these homemade peanut butter cups at a dinner party, and I bit into it expecting something cloyingly sweet. Instead, that salted caramel hit differently—it stopped the chocolate from being too rich, and the sea salt flakes made my taste buds do a little dance. I went home that night determined to figure out how she made them, and after a few sticky experiments and one batch that came out looking more like chocolate puddles, I finally cracked the code.
I made these for my coworkers during a particularly brutal week of deadlines, and watching their faces light up when they bit into one—that moment of pure happiness—reminded me why I love cooking for people. Someone actually said it was the best peanut butter cup they'd ever had, which probably isn't true, but I'll take it.
Ingredients
- Semisweet or milk chocolate (300 g or 10 oz), chopped or chips: Chopped chocolate melts more evenly than chips, but chips work if that's what you have on hand.
- Coconut oil or unsalted butter (2 tbsp): This thins the chocolate just enough to coat smoothly without making it greasy.
- Creamy peanut butter (120 g or ½ cup): Don't use the natural kind that separates unless you stir it well first, or the filling gets weird.
- Powdered sugar (2 tbsp): This sweetens and lightens the filling without making it gritty.
- Unsalted butter, softened (1 tbsp): Softened butter blends seamlessly into the peanut butter; cold butter fights you the whole way.
- Vanilla extract (½ tsp): A small amount that quietly deepens the peanut butter flavor without announcing itself.
- Granulated sugar (100 g or ½ cup): For caramel, you need regular sugar—it caramelizes more reliably than other types.
- Unsalted butter (2 tbsp): Adds richness and helps emulsify the caramel as it cools.
- Heavy cream (60 ml or ¼ cup): It will bubble and steam when it hits the hot caramel, which is exactly what you want.
- Fine sea salt (¼ tsp): This dissolves into the caramel and balances everything.
- Flaky sea salt, for sprinkling: Use the good stuff here—Maldon or something similar that has actual texture.
Tired of Takeout? 🥡
Get 10 meals you can make faster than delivery arrives. Seriously.
One email. No spam. Unsubscribe anytime.
Instructions
- Set up your workspace:
- Line a muffin tin with paper liners and lay everything out—this recipe moves faster once you start melting chocolate.
- Melt the chocolate:
- Set a heatproof bowl over simmering water (not touching the water) and add your chopped chocolate and coconut oil, stirring occasionally until it's completely smooth and glossy. If microwaving, do 30-second bursts and stir between each one so you don't accidentally seize the chocolate.
- Create the chocolate base:
- Spoon about 1 tablespoon of melted chocolate into each paper liner, then tilt and rotate the tin so the chocolate coats the bottom evenly. Pop the whole tin into the freezer for 10 minutes—you want these set but not rock hard.
- Make the peanut butter filling:
- In a bowl, combine the softened butter, creamy peanut butter, powdered sugar, and vanilla, stirring until everything is smooth and creamy with no streaks. Divide into 12 equal portions and gently flatten each one into a disc that'll fit on top of your chocolate bases.
- Prepare the salted caramel:
- Pour sugar into a saucepan over medium heat and let it sit, swirling the pan occasionally but never stirring with a spoon—let the heat do the work. Once it turns a deep amber color (this takes about 5 minutes), add the butter and let it bubble for a moment.
- Add the cream carefully:
- Slowly pour in the heavy cream while whisking—it will hiss and steam dramatically, but keep whisking until it's smooth and unified. Stir in the fine sea salt, then set the pan aside to cool for about 10 minutes until it's thick but still pourable.
- Assemble the cups:
- Pull the chilled chocolate bases out of the freezer and place one peanut butter disc on each one. Spoon about 1 teaspoon of cooled caramel onto each peanut butter layer.
- Top with chocolate:
- Cover each cup with a generous layer of the remaining melted chocolate (you may need to gently reheat it if it's gotten too thick), smoothing the tops with the back of a spoon.
- Add the finishing salt:
- While the chocolate is still soft, sprinkle a tiny pinch of flaky sea salt on top of each cup—this is where the magic happens.
- Final chill:
- Refrigerate for at least 30 minutes until the chocolate is completely set and the caramel inside has firmed up enough that the cups hold their shape.
 Save
Save My roommate once ate an entire batch I'd left on the counter, and instead of being mad, I just laughed because it meant they were really, truly good. That's when I knew these had crossed over from being a nice homemade treat to being something worth making again and again.
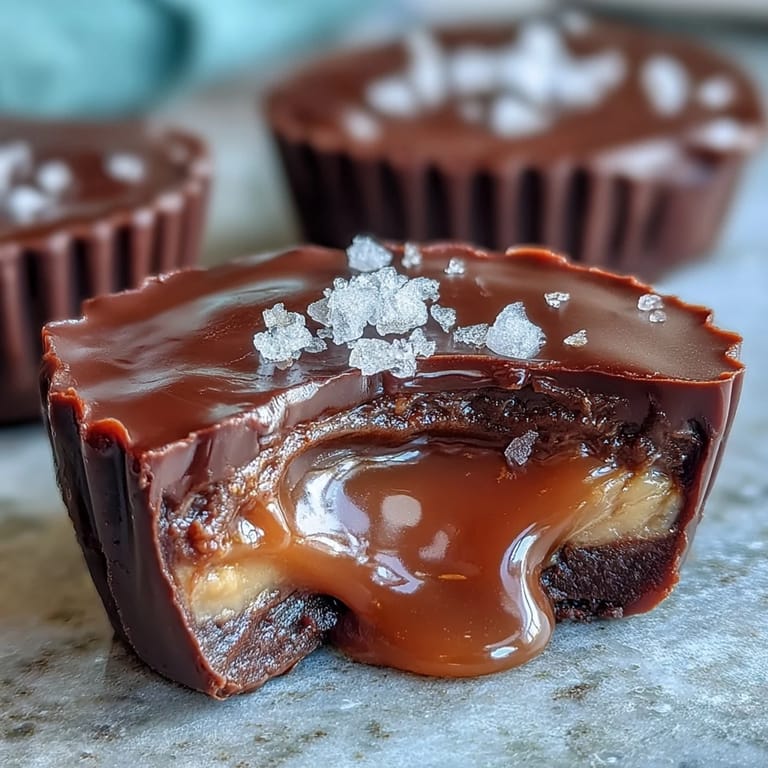
Why the Salt Matters
The flaky sea salt on top isn't a garnish—it's the entire point. It wakes up your palate and prevents the sweetness from getting cloying, kind of like how a good bitter coffee balances a sweet dessert. Without it, these are nice. With it, they're something you'll think about for days afterward.
Storing and Keeping Them Fresh
These last surprisingly well in an airtight container in the fridge for up to a week, though honestly they rarely make it that long in my house. The chocolate stays glossy, the caramel stays gooey, and everything just tastes better cold anyway.
Playing Around with Flavors
Once you nail the basic version, the fun really starts. I've added cinnamon to the caramel, used almond butter for something slightly different, and even tried a hint of espresso powder in the chocolate layer. The structure stays solid no matter what you tweak, which is the mark of a really good recipe.
- Swap in almond or sunflower seed butter if peanuts are off the table for you.
- A tiny pinch of cinnamon in the caramel adds warmth without taking over.
- Make sure all your ingredients are at room temperature before you start, except the bases which need to be cold.
 Save
Save These peanut butter cups have become my go-to gift for people I actually like, and my secret weapon when I want to impress someone in the kitchen without spending all day there. Make them once and you'll understand why.
Recipe FAQs
- → How do you make the salted caramel?
Sugar is melted until golden without stirring, then butter is added and melted in. Heavy cream is slowly whisked in to create a smooth sauce, finished with fine sea salt for balance.
- → Can I substitute peanut butter with something else?
Yes, almond butter or sunflower seed butter can be used for a nut-free alternative without compromising texture or flavor.
- → What’s the purpose of chilling between layers?
Chilling helps to firm the chocolate layers, making it easier to add fillings and achieve clean, defined layers in the final cup.
- → How long should these cups be refrigerated?
They should chill for at least 30 minutes to set properly and can be stored in an airtight container for up to one week.
- → Can I add any flavor twists to the caramel?
A pinch of cinnamon adds a warm note to the salted caramel, enhancing the overall flavor complexity.